Requests
A request is how you ask a client for documents: you define what you need, FileOnion sends the client a secure upload link, and you track everything through to approval. This page covers the anatomy of a request, the ways to create one, sending, reviewing, and day-to-day management.
Anatomy of a request
Every request is built from the same parts in the request composer. The composer opens as a dialog (full-screen on mobile) from anywhere you can create or edit a request — the Requests page, the Kanban board, a request's detail page, Templates, or a client's page — with each part below as a collapsible section. A size toggle in the header expands it to full width, and your choice is remembered. If a save fails validation, the section that needs attention is badged, opened, and scrolled into view.
- Request title and an optional description — what this request is about. Both support variables (for example the client's name) so templates personalize automatically.
- Recipient — the client the request goes to. Search your client list or add a new client without leaving the composer. See Clients.
- Request type — either an open request (the client can upload any files) or a document list (you specify each document the client must provide).
- Document items — for document-list requests, each item has a name, a description, an optional checklist of acceptance criteria (for example "not expired", "shows all four corners"), and a Required flag.
- Settings — an optional due date, an expiry date (after which the link stops working), reminders (automatic reminder emails to the client on a schedule you pick), Group files (creates a folder per document as files arrive), the Auto review toggle (AI pre-review of client uploads for this request; see Auto Review), and Client portal view (Classic or Guided — how the request is presented to the client).
- Tags — free-form labels for filtering and reporting. Tags also drive template categorization in the Template Library.
- Assignment & Visibility — who on your team owns the request and who can see it (see below).
Creating a request
There are three ways to start:
- From scratch — click New Request and fill in the composer.
- From a template — pick a template in the composer's template dropdown, or go to Templates → Requests and choose Create request from template. See Templates and the Template Library.
- With AI — open the AI Request Builder panel in the composer, describe the matter in plain language, and it recommends a scoped document set with per-document checklists and drafts the title. Everything drops into the form for you to edit before sending. See AI Request Builder.
Statuses and stages
Each request carries a status that updates automatically as the client acts on it. The default pipeline:
| Status | Meaning |
|---|---|
| Sent | The request went out; the client has not opened it yet. |
| Read | The client opened the request. |
| Partial | Some documents are uploaded, others are still missing. |
| Needs review | The client has submitted; files are waiting for your review. |
| Approved | You approved the submission. |
| Closed | The request is complete and closed out. |
| Expired | The request passed its expiry date and the link no longer works. |
Requests you save without sending sit in the Drafts tab until you publish them, and archived requests move to the Archived tab.
Statuses map onto your workflow stages — the columns on the Kanban board (by default: New, Client Open, Files Uploaded, Needs Review, Approved). Each stage is backed by a status: the New column holds Sent requests, Client Open holds Read, and so on. Owners and Admins can rename, add, reorder, or automate stages depending on your plan; see Workflows.
Assignment & Visibility
The Assignment & Visibility section of the composer controls ownership and access:
- Assign to — pick a user or a team as the owner. The assignee appears on the request card and the Kanban board.
- Visibility — by default a request is visible to your whole firm; you can restrict it to the assigned team only, share it with specific people, or make it Private (assignee and creator only, plus Owners and Admins).
You don't have to open the composer to change these. From a request card — in the list, tiles, or Kanban view — the assignee avatar or kebab opens a quick "Assign & visibility" menu, where you can reassign the request or flip its visibility between Private and Everyone in place.
Teams, visibility, and sharing are available on Professional and Enterprise plans. See Teams & Sharing.
Sending a request
The composer gives you two actions:
- Save — saves without sending. The dropdown lets you Save as draft (finish later) or Save as template (reuse the structure; see Templates). Saving as a template doesn't close the composer — you can keep editing and send the request too, and the menu item becomes Update template so further edits refine the same template rather than creating duplicates.
-
Save & Send — saves and sends the request to the client. This menu is available to Owners and Admins, with three delivery options:
- With magic link — the email contains a link that opens the client's upload portal directly, no sign-in.
- With secure magic link — same link, but the client must also enter a one-time verification code before the portal opens.
- Without magic link — the notification is sent without a portal link (available when your setup supports it).
A client added with only a mobile number always receives the secure variant by text, whichever option you pick — it's the only form of link they can sign in from. See Clients without an email address.
If you enabled Reminders, FileOnion automatically emails the client on your chosen schedule until the request is fulfilled. Reminders go by email only, so a client with no email address on file doesn't receive them. You can also resend manually at any time from the request list menu (Resend Request or Resend Secure Link).
Checkpoint
After Save & Send, the request shows status Sent in your request list and appears in the first stage of your Kanban board.
Reviewing submissions
Open a request to review what the client sent. The request view has three tabs — Documents, Comments, and Activity — plus a progress summary of pending, submitted, and approved items.
- Per file: open any uploaded file in the viewer and Approve it, or Decline it with a reason. The decline reason is posted as a comment so the client knows exactly what to fix. In review mode the arrow keys move between files, A approves, and D declines.
- Per request: once every document has been submitted, use Approve All Documents to approve the request in one step.
- Comments: discuss individual documents or the request as a whole with your client — they see and reply from their portal.
- AI summaries: uploaded files can be summarized and classified automatically to speed up review (supported for common image formats and PDF).
- The review rail: with auto review on, review mode carries a right-hand rail showing the AI's verdict, quoted checklist evidence, and a pre-drafted decline for anything flagged. See Auto Review → The review rail.
The request command bar
Every request detail page has a sticky command bar across the top, so the most-used actions stay in reach as you scroll. From left to right it shows a back button, the client identity (avatar, name, and title), status and due-date chips, and a ranked cluster of actions.
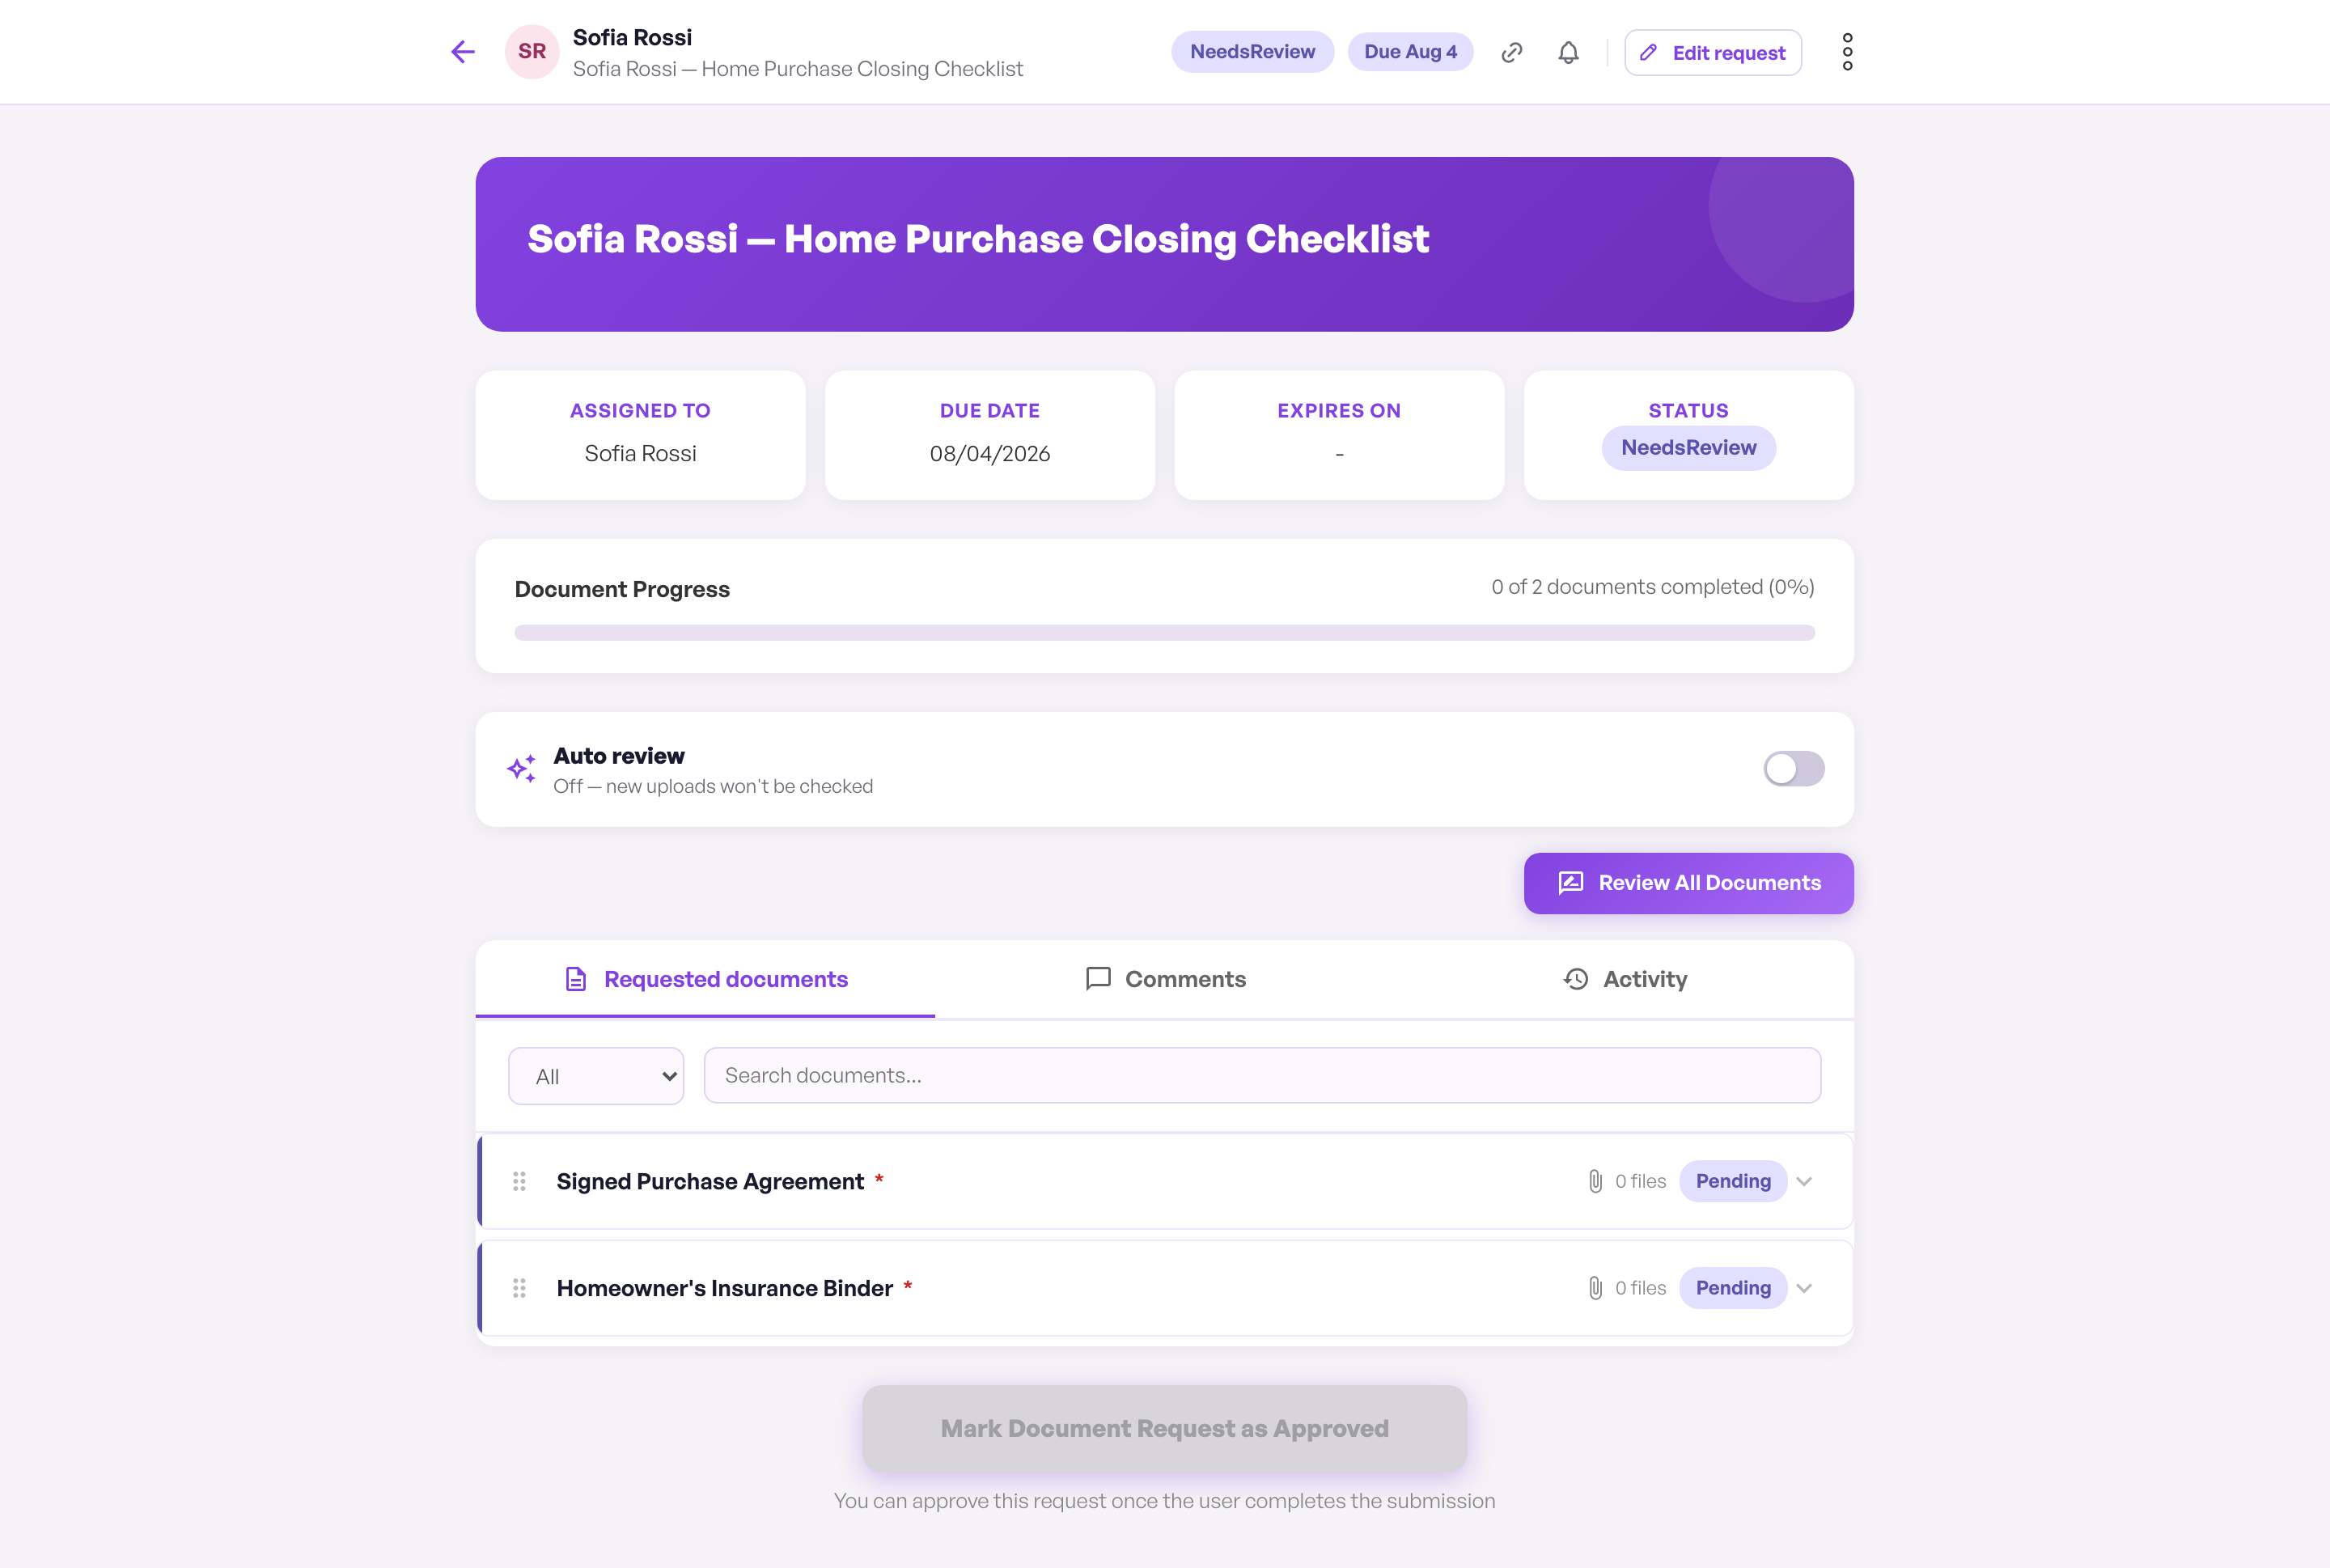
For Owners and Admins, the action cluster contains:
- Copy client link and Send reminder as quiet icon buttons (on published requests only). Copy client link copies the client's magic-link URL to your clipboard so you can share it directly.
- A state-primary button: Publish on drafts, or Unarchive on archived requests.
- Edit request, which opens the composer.
- A kebab menu with the rest: Assign & visibility…, Resend Secure Link (published requests), Switch to classic view, Archive request, and Delete request.
The classic ⇄ new view toggle now lives in this kebab menu rather than the page header.
Views: List, Tiles, and Board
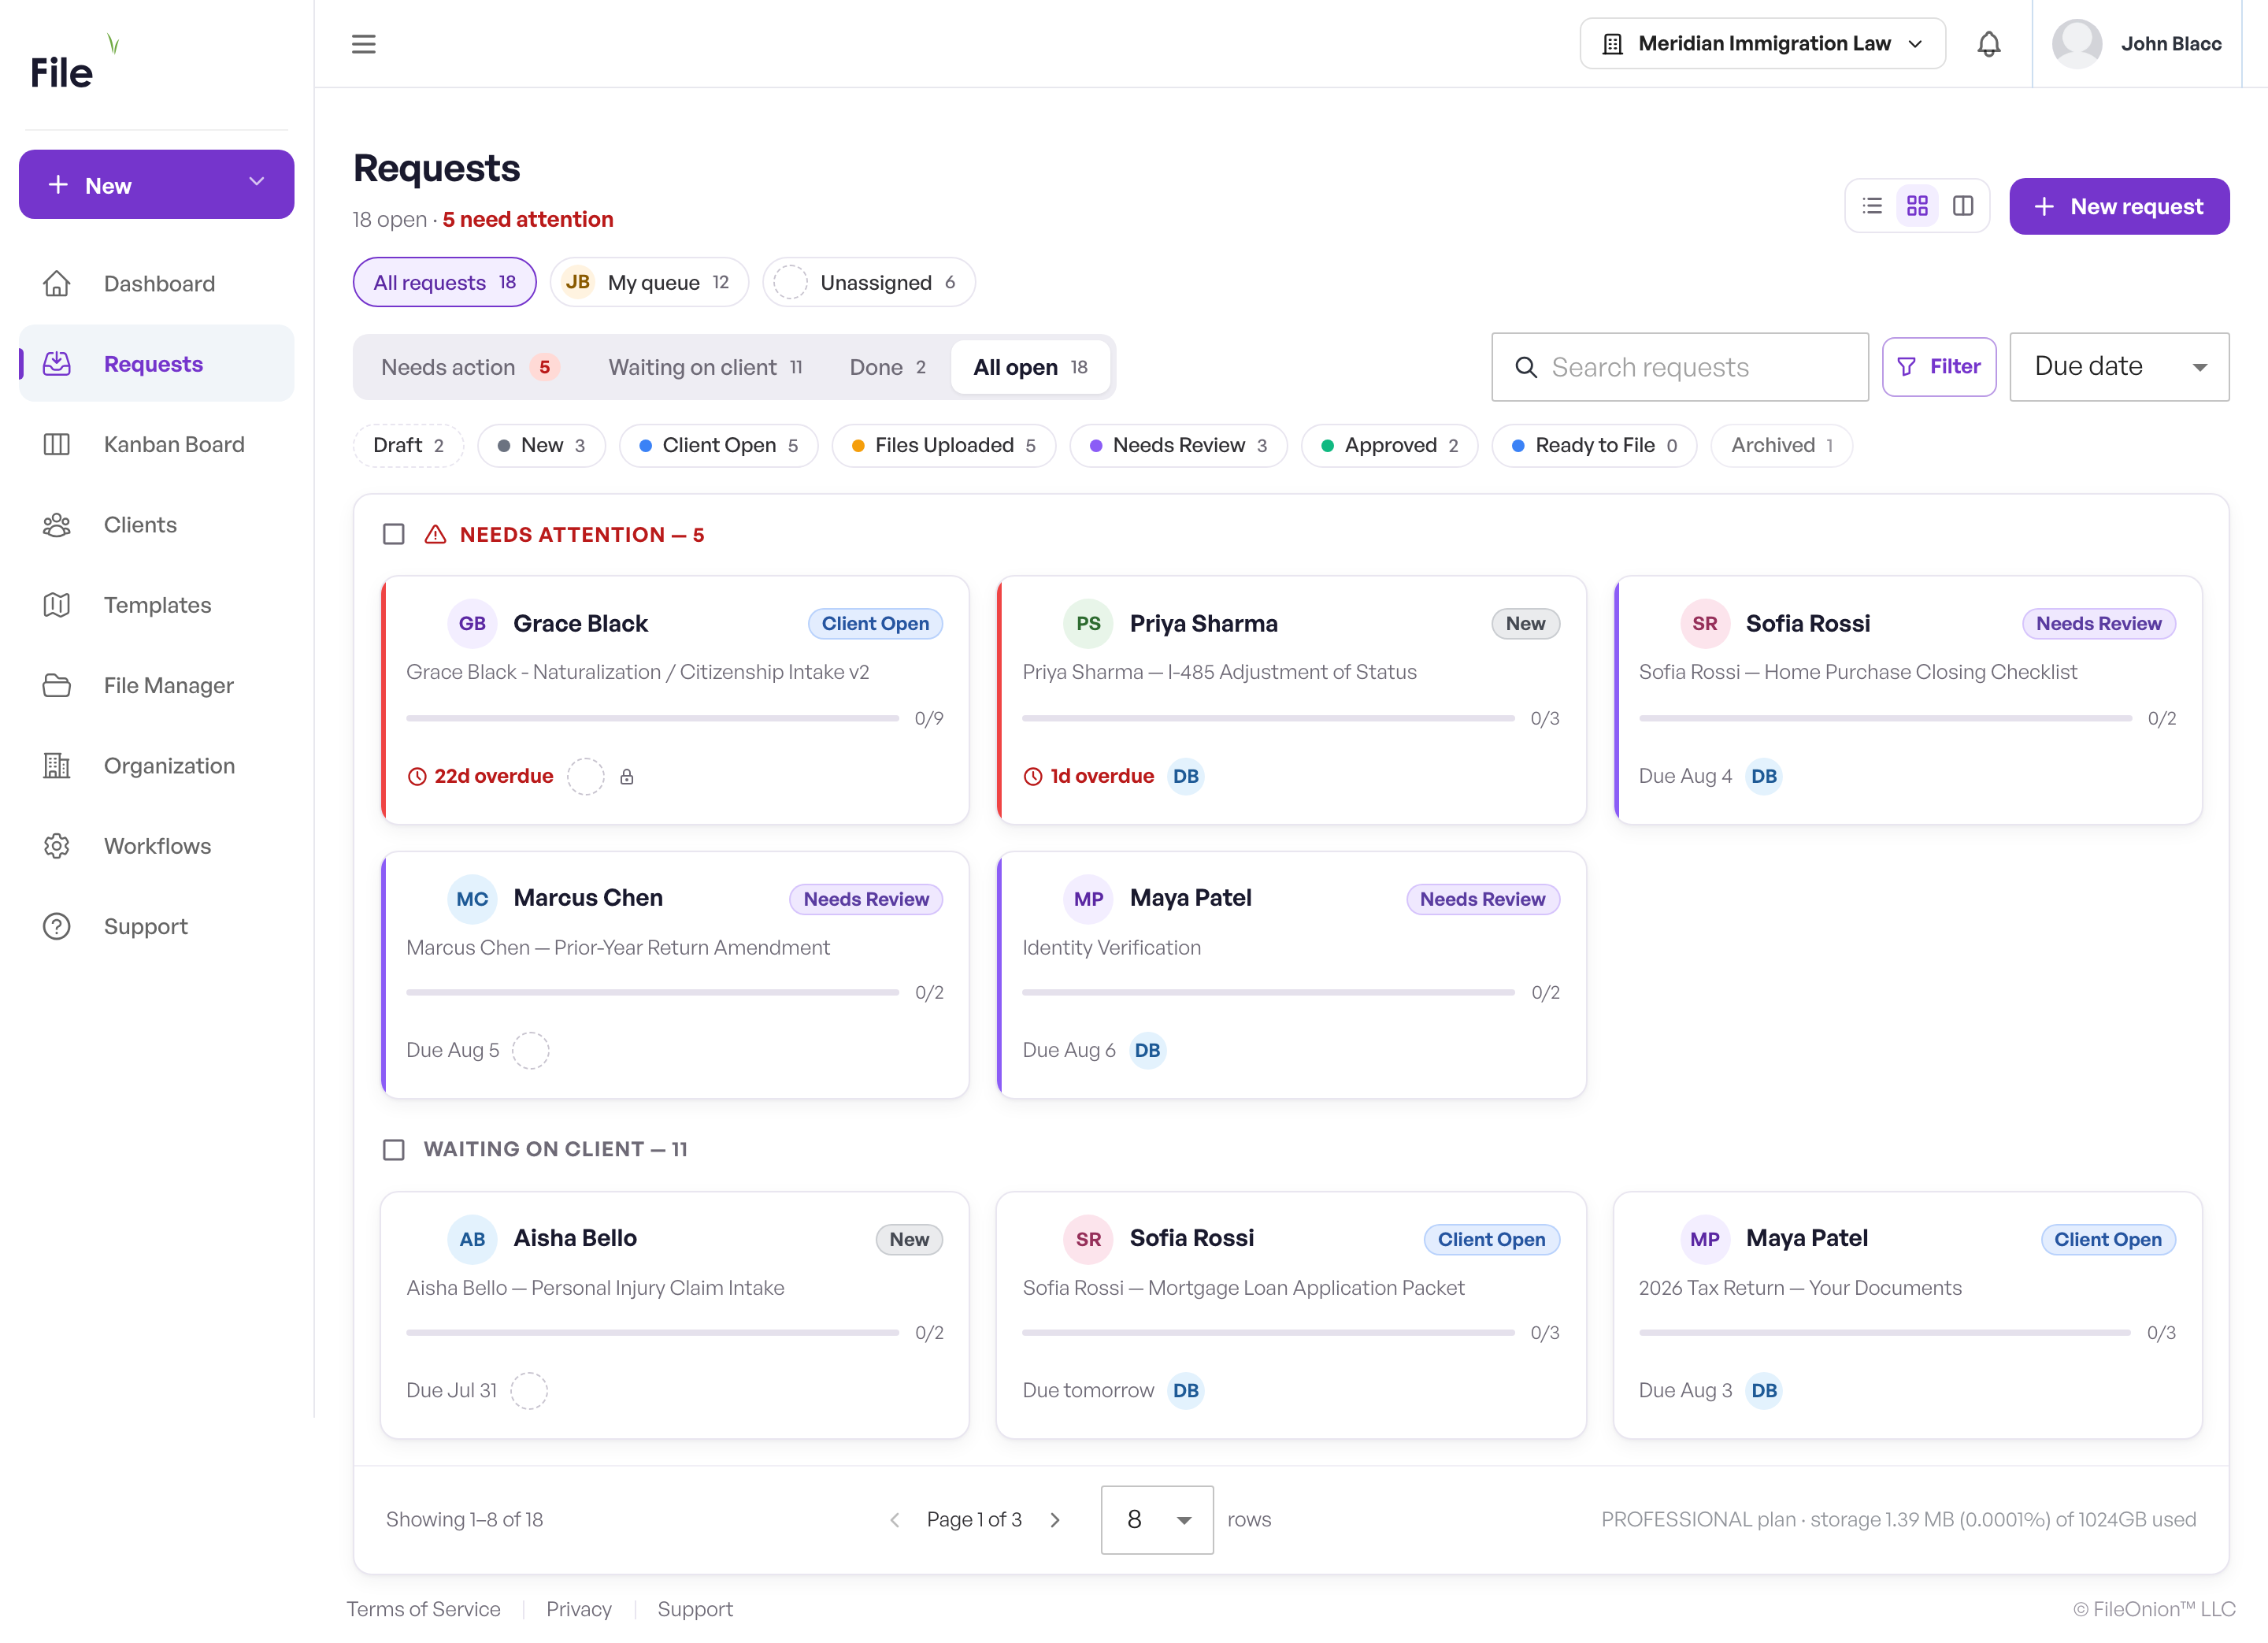
The Requests page has a three-way toggle between list, tiles, and board layouts. The board view opens the Kanban board, where requests appear as cards in stage columns — drag cards between stages to move them along. See Kanban Board.
Two rows of filters sit above the results in every view:
- Queue pills — All requests, My queue (assigned to you), then one pill per teammate who has requests assigned, and Unassigned. Each carries a live count.
- Triage segments — Needs action, Waiting on client, Done, and All open, followed by a row of stage chips (Draft, New, Client Open, Files Uploaded, Needs Review, Approved, Ready to File, Archived) so you can narrow to a single stage.
Editing, resending, archiving, deleting
From the request list, each row's menu offers:
- View request — open the request detail and review screen.
- Edit request — change anything in the composer, then Save changes; click Resend to notify the client of the update.
- Archive request / Unarchive — move it out of (or back into) your active list.
- Resend Request / Resend Secure Link — send the notification again.
- Delete request — permanently remove it (you are asked to confirm).
- Publish request — on drafts, sends the request out.