Kanban Board
The Kanban board shows your document requests as cards organized into columns, where each column is a workflow stage. Every team member can use it to see where work stands and move requests forward with drag and drop. Owners and Admins configure the stages and automation behind the board in Workflows & Automation.
Opening the board
There are three ways in:
- Click Kanban Board in the sidebar.
- On the Requests page, use the list / tiles / board view toggle in the toolbar and choose board.
- On a phone, open the More menu in the bottom navigation and tap Kanban Board.
Checkpoint
You should see the Request Management board: one column per workflow stage, arranged left to right in your workflow order, with your requests as cards inside them.
Reading the board
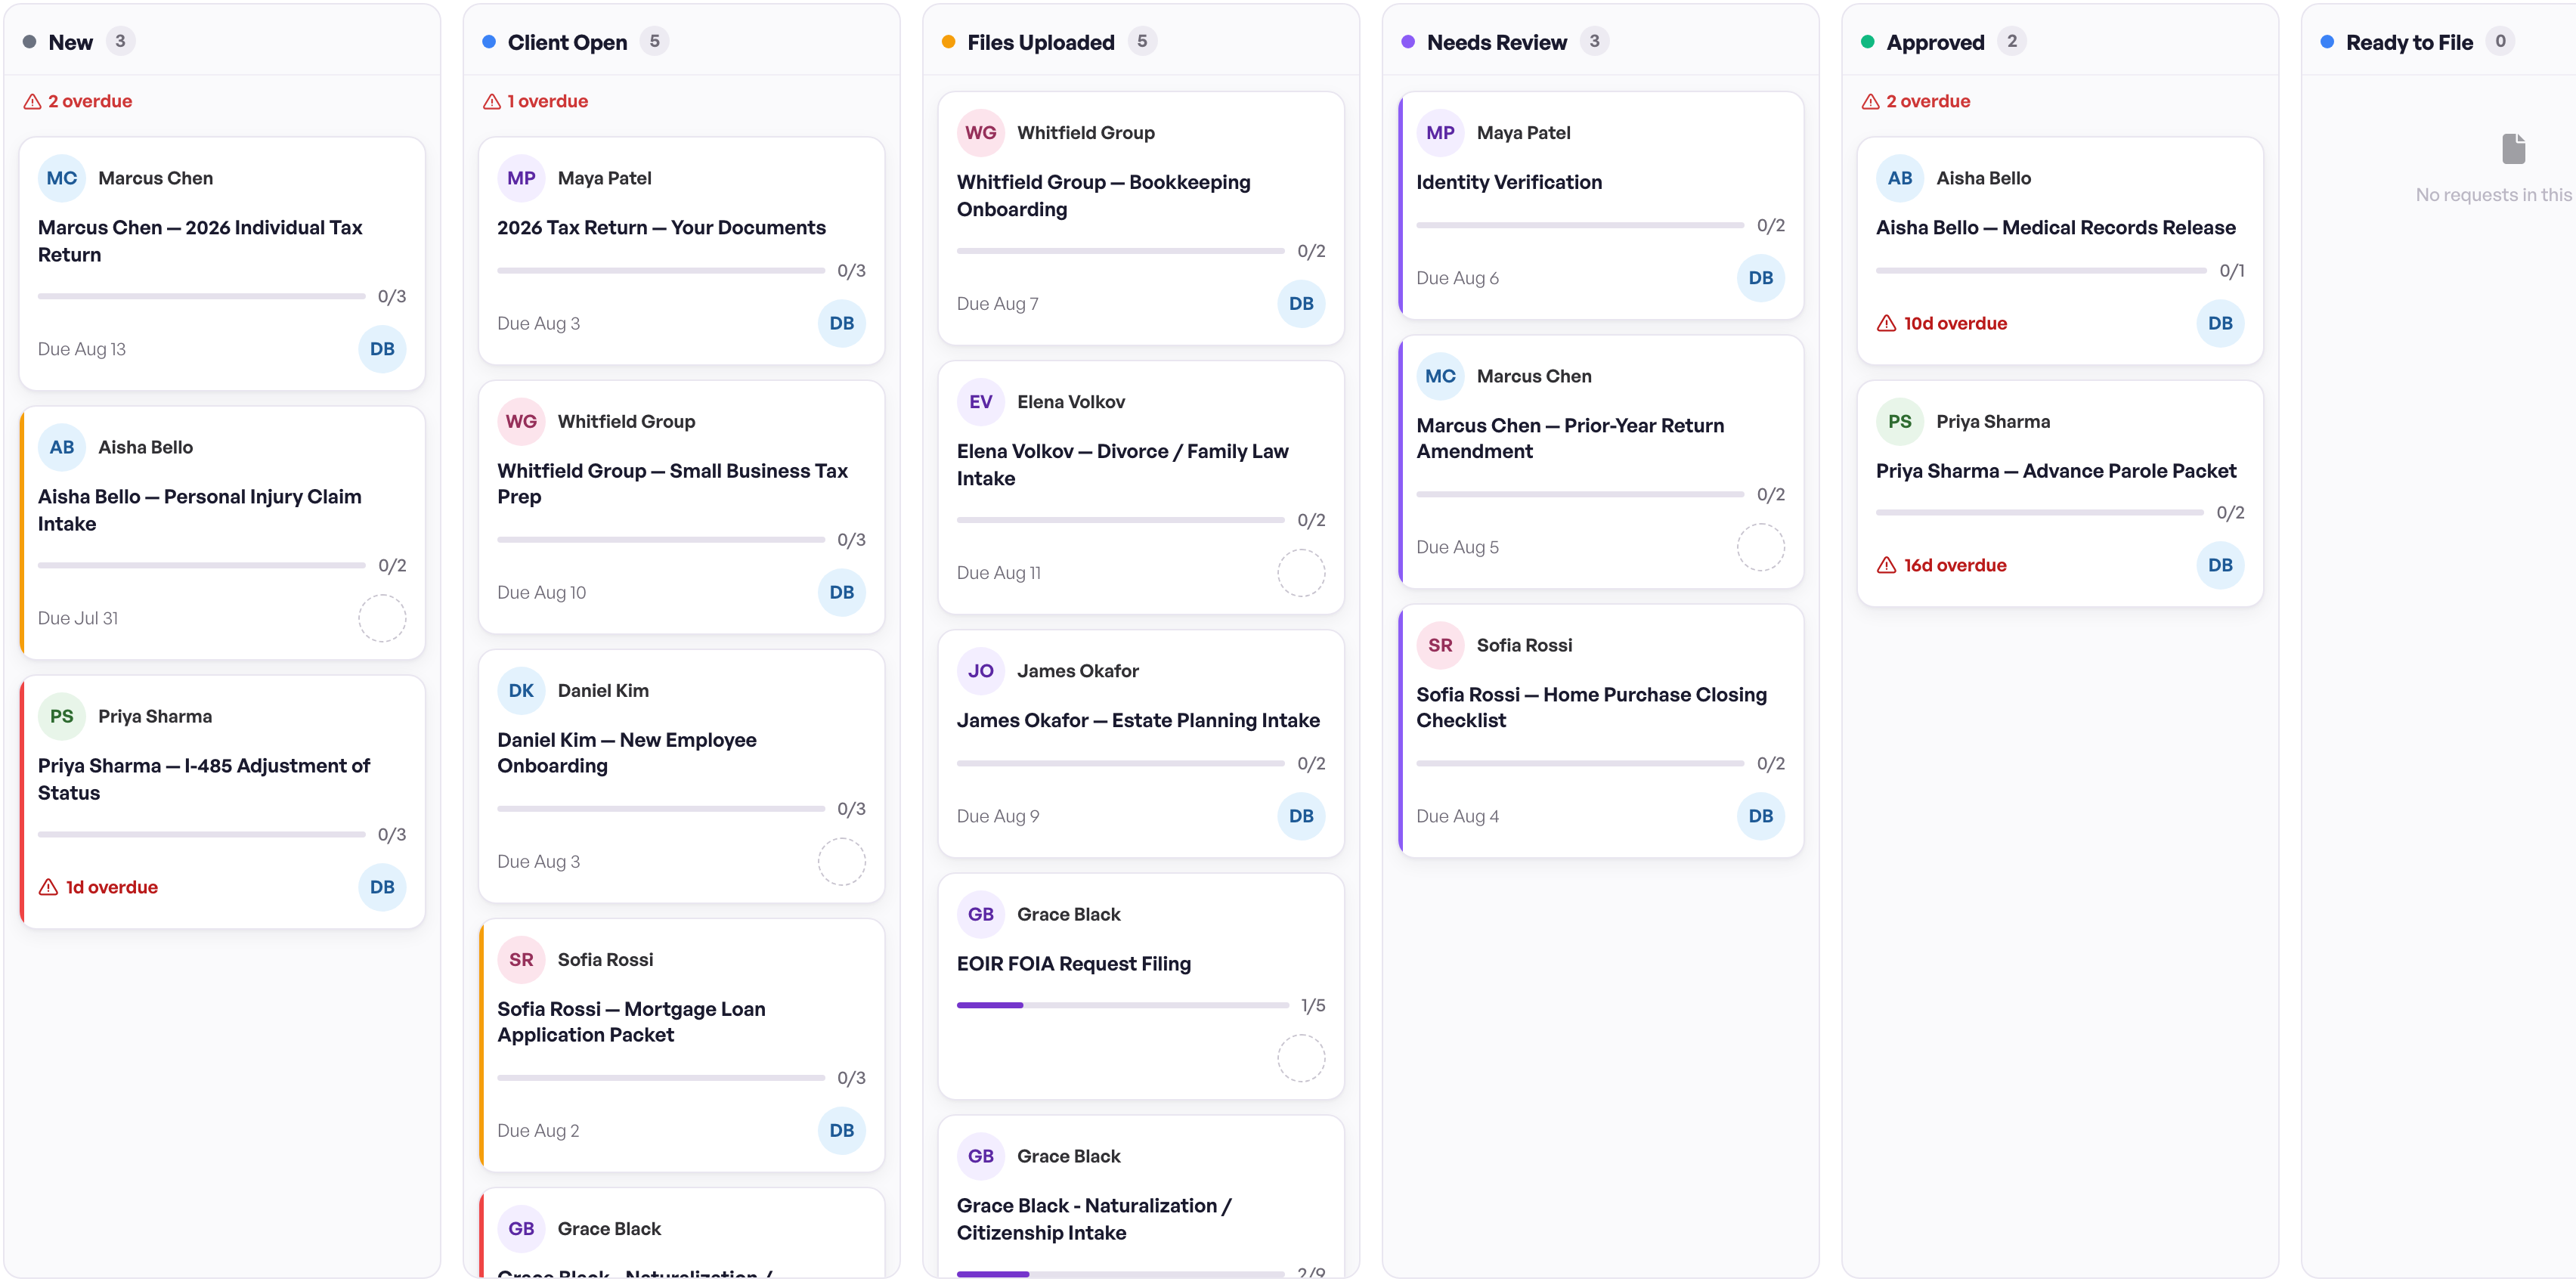
Columns
- Columns match your workflow stage order.
- Each column header shows the stage's color, name, and how many requests it holds.
- Stage-colored column headers are sticky — they stay in view while you work.
- Each column scrolls independently under its header within a bounded board height, so you no longer scroll the whole page to reach the bottom of a tall column.
- If a stage has a work-in-progress limit, the header also shows the count against the cap (for example "4/5 items") — see Stage limits.
Cards
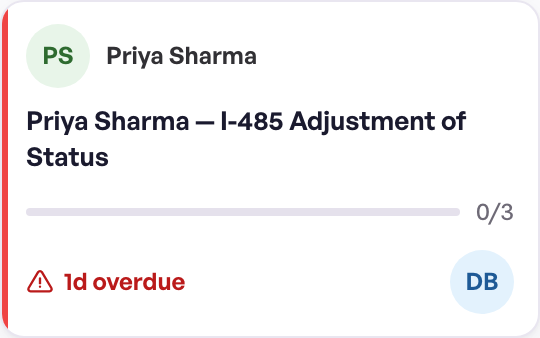
Each request card shows:
- The client (avatar and name) and the request title.
- A document-progress indicator showing how many of the requested documents are in — for example "2 of 3".
- A left urgency rail that signals attention, not the stage color: red for overdue or expired, violet for needs review, and amber for expiring soon.
- An SLA line, shown only when a stage SLA is at warning or breached — there is no longer a green "within SLA" indicator. See SLA indicators.
- Quick actions on hover. The kebab menu and the assignee avatar both open the Assign & visibility menu, where you can reassign the request and toggle it between Private and Everyone.
- The assignee avatar. An unassigned request shows a dashed avatar ring — assignment no longer falls back to whoever created the request. See Teams, Assignment & Sharing.
- A link-expiry chip when the request's link has an expiry date — it turns red as expiry approaches.
- A visibility chip when the request isn't visible to everyone: Team, Private (lock icon), or Shared. See visibility levels.
Click any card to open the request in a drawer, where you can review and edit it.
Default stages
Every organization is seeded with five stages: New, Client Open, Files Uploaded, Needs Review, and Approved. Each stage is backed by a request status — New by Sent, Client Open by Read, Files Uploaded by Partial, Needs Review by Needs Review, and Approved by Approved. Owners and Admins can rename these stages and add custom ones alongside them — see Creating a stage.
Moving cards
Drag a card from one column to another to move the request through your workflow:
- Click and hold the card (on touch screens, press and hold briefly, then drag).
- Drag it over the target column.
- Release to drop.
When you move a card, FileOnion:
- Checks whether the move is allowed by your transition rules.
- Moves the card immediately if it is.
- Runs any automated actions configured for that transition in the background — emails, webhooks, assignments, and status updates.
The board also updates live as your teammates work, so cards move and appear without refreshing the page.
When a move is blocked
If a transition rule prevents the move, the card snaps back and an error explains why:
| Message | Why |
|---|---|
| "This transition is not allowed." | The rule for this move is set to Blocked. |
| "This transition is not configured." | Rules exist for the current stage, but none covers this exact move. |
| "Requires one of these roles: …" | The move is restricted to the listed roles. |
| "This transition requires approval. …" | The rule requires approval, so the move can't be completed with a drag. |
If you believe a move should be allowed, ask an Owner or Admin — they can adjust the rule under Settings → Workflows → Transition Rules.
Filtering the board
Use the All / Mine / My team control at the top of the board to choose which requests you see. Each option shows a live count of the requests it matches.
| View | What it shows |
|---|---|
| All | Every request you have access to |
| Mine | Requests assigned to you — Mine filters by assignee only and no longer counts requests you merely created |
| My team | Requests assigned to your teams |
Note
The My team option only appears if you belong to at least one team. See Teams, Assignment & Sharing.
SLA indicators
When a stage has an SLA deadline configured, cards in that stage show an SLA line only when it needs attention. The line is hidden while the SLA is healthy:
| Indicator | Meaning |
|---|---|
| Amber + "Xh remaining" | Warning — approaching the deadline |
| Red + "SLA breached" | Breached — the deadline has passed |
Owners and Admins set SLA deadlines and warnings per stage — see SLA tracking.
Stage limits (WIP)
Stages can carry a work-in-progress limit (Maximum Items, set by an Owner or Admin when creating or editing the stage). On the board:
- The column header shows the current count against the cap, for example "5/5 items".
- When the column is at or over its limit, a red Full tag appears in the header.
The limit is a signal, not a lock — treat a Full column as a prompt to clear work in that stage before pulling more in.
Quick actions
- Manage Stages (Owners and Admins) — opens a dialog to add, edit, or reorder stages without leaving the board.
- Board Settings (Owners and Admins) — jumps to the full Settings → Workflows page.
- New Request — starts a new document request.
- Click any card to open and edit the request.
Kanban on a phone
The board adapts to small screens:
- Columns scroll horizontally — swipe left and right to move between stages.
- Cards use a compact layout.
- To move a card, press and hold it briefly, then drag it to the target column and release.
- Use the new-request button in the bottom navigation to create a request.
Related
- Workflows & Automation — configure the stages, actions, and rules behind the board
- Teams, Assignment & Sharing — assignment, visibility chips, and the My team filter
- Requests — creating and managing document requests